source: digital-photography-school
Exposing to the right (often referred to as ETTR) is a technique
that seems to polarize opinions across the internet so you can find
plenty of examples of people supporting its use and an equal number of
people claiming it adds no value. The principles of the technique
however do hold value and are valid to consider when out taking images.
As it is a technique that I regularly employ when photographing
landscapes I wanted to share the reasoning behind it, and show an
example of the benefit it can bring.
The term ‘expose to the right’ refers to the histogram
associated with an image. Typically, for a shot to be well exposed, we
are taught to aim for an even spread of tones across the histogram,
peaking in the middle, and tapering off at the edges. When ‘exposing to
the right’, the idea is to push the peak of the histogram as far to the
right hand side as possible, i.e. overexpose the image, without
clipping any highlights. The resulting file, when processed back to the
correct exposure, will contain more tonal information and less noise in
the shadow areas, maximizing your image quality.
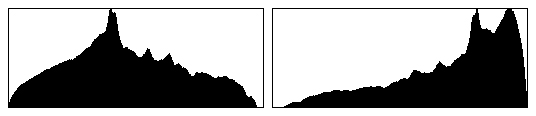
Left: A histogram showing a 'correct' exposure. Right: An 'exposed to the right' histogram
Let’s consider the CCD or CMOS sensors found in most digital cameras.
Typical DSLR sensors can capture seven stops of dynamic range and
produce 12-bit raw image files, capable of recording 4096 tonal levels
in each red/green/blue channel. The ability to record such a large
number of tones should guarantee smooth transitions between the tones
within the resulting image, however it is not quite that simple.
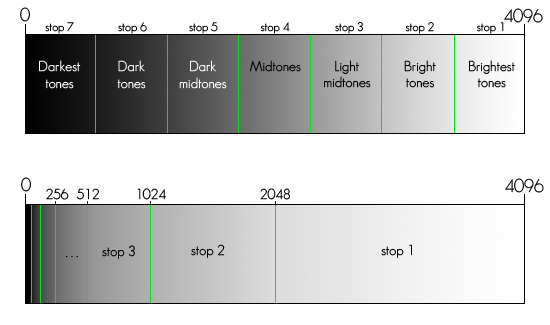
Whilst you might think that each of the seven stops in the range of
the sensor record an even number of tones throughout the dynamic range,
you would be mistaken. F-stops are logarithmic in nature meaning that
each stop records half of the light of the previous one. Practically,
this means that the brightest stop records half of the possible number
of tones, i.e. 2048, the second stop records half again, i.e. 1024, and
so on until the seventh stop that records only 32 tonal levels.
Therefore, if you underexpose an image and correct the exposure during
in post processing, the tonal transitions in the darker areas will not
be as smooth, and the risk of degrading your image quality is much
higher. If you overexpose your image, by pushing the histogram to the
right, you will capture much more tonal information that results in much
better image quality when correcting the exposure in post processing.
The diagram below tries to illustrate the distribution of tones for
each stop of the dynamic range of the sensor. The top image shows the
seven different stops capturing different portions the dynamic range
from the darkest through to the brightest tones, however the bottom
diagram shows those stops but sizes them relative to the number of tonal
levels that each stop captures. As you can see, number of tonal levels
captured by the brighter stops is significant compared to the stops at
the lower end of the dynamic range.
A tangible way of demonstrating the difference in the amount of tonal
information recorded is to take two images of the same scene, one
underexposed, one overexposed and compare the file sizes: the
overexposed raw file will be larger that the underexposed shot as it
contains more data.
Let’s look at an example. The image below shows two unprocessed
shots taken within seconds of one another, with their associated
histograms. The shot on the left is underexposed and the shot on the
right is exposed so that the histogram is pushed up to the right hand
side, as far as practically possible without losing any highlight detail.
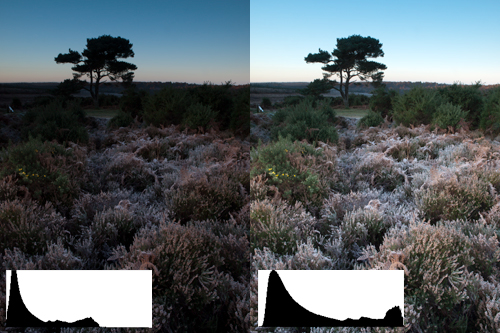
Left: Underexposed image. Right: Exposed to push the histogram to the right
During processing, the exposure of each shot can be adjusted to give what seem to be two identical images.

Left: Underexposed image. Right: 'Exposed to the right' image. Both undergone exposure correction during post processing
However, when you look in detail at a 100% crop of an area of each
image, you can see a huge difference in the quality of the final image.
The shot that was underexposed (i.e. exposed to the left) shows much
less smooth transitions between tones and much more noise in the darker
areas than the image that was exposed to the right.

Left: Underexposed image. Right: 'Exposed to the right' image. 100% crops to demonstrate difference in image quality.
Images that have been exposed to the right will need some additional
post processing to correct the exposure, but as you can see, a bit of
extra thought when determining your exposure and some extra steps to
correct it during post processing can result in image files with
smoother tonal transitions and reduced image noise.
It is not a technique that is universally applicable to all types of
photography, as there is a risk of clipping highlights if care is not
taken when exposing your image. Exposing to the right is most suited to
when photographing in a controlled environment, for example, when
shooting landscapes, using graduated filters to ensure that all
highlights are contained within the dynamic range of the sensor. The
last thing you want to do is to lose highlight detail when trying to
maximise your image quality.
So give it a go, take two images at different exposures (one exposed
normally, one exposed to the right) and see if you can see a difference.
Understanding the performance of your individual sensor in such a way
is a step further to knowing how to get the most out of your camera.
written by Elliot Hook
source: digital-photography-school
With respect to the author, my opinion on the well-written article above is that you always have to envision the shot before taking it even if this means that you have to use the LiveView option of most modern cameras to estimate the result. Using that method you will often find out that you don't need to notice how the histogram looks. It is true that exposing to the right has many benefits (as well as exposing to the left, so a boosting in dark areas will be needed, thus boosting noise and detail) but in the end it comes to what you want to do with the resulting photo. A small size use will not have much relevance on how you processed it and from what point, but a large use will surely benefit from lack of noise (and detail when shooting in low light).
Some years ago I found out that when darkening a bright image there's much less noise than when lightening a darker one, though. So I strongly support the ETTR method using as a guide my camera's LiveView option. Keep in mind that it is even possible to moderately overdo the Exposing to the right method as modern software solutions can recover some of the bright details on highlights, but this is a very thin line!